This is How to make a needle lighter for Dummies. 😉 The original document
[sixthseal.com], which describes a more “orthodox” way of making a
needle lighter*, is deprecated by this revision for the more apathetic
(or chronologically conscious, depending on which way you look at it
really) ones amongst us. It is a heavily truncated and modified version
of the original guide using different starting materials as a shortcut
to producing a functional needle lighter. All credit goes to my friend
who described the methodology of this variation. This one can be
assembled within seconds, without prior experience with origami or
childhood time spent helping mom bake in the kitchen.
* Please correct me if I’m wrong, for needle lighters are new to me
since I’ve never felt the urge to slow the combustion process down by
using a low heat flame (we tend to go hard at the expense of mileage
here on sixthseal.com ;)), so I’m not sure which came first – the
needle or the foil.

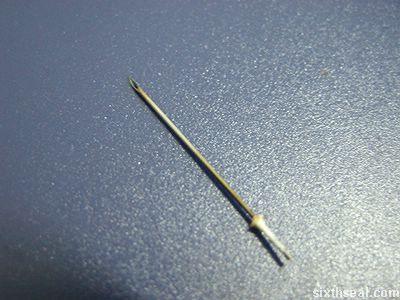
It also puts the “needle” into “needle lighter” – literally. This
needle lighter really has a syringe needle in it – note the bevel on
the tip of the needle. Thus, caution MUST be exercised when this
lighter is used in a group setting, since needle stick injuries can
happen, especially when jittery hands attempts to light the needle
lighter at the needle point with another lighter to start it up. Please
maintain extreme vigilance when this lighter is to be used by people
other than yourself – treat it as a syringe, coz it is a syringe.
That said, the shopping list for this easy to make needle lighter is short and sweet:
1. Syringe needle

This is available at your friendly neighborhood pharmacy outlet.
You’ll want a lower gauge needle for optimal results. The gauge of a
syringe rating specifies the diameter of the syringe, the higher the
number is, the “thinner” it is. I’ll go for at least 27G and 23G seems
to produce the optimal (in my humble opinion) results. Don’t ask for
insulin syringes, those are 29G needles meant for IV use. It’s
generally too frail for this purpose. Unless you’re planning another
route of administration, get the needles separate from the syringe
body, since you won’t be using that anyway.
Syringe needles may be a restricted item where you live. If that is
the case, there are no shortcuts for you, unfortunately. However, I’ve
never had problems getting syringes over here – walk in confidently and
tell the pharmacist specifically what you want. There are two possible
ways to get it – by asking nicely and through intimidation. Naturally,
the first option is the preferred method. It is possible to get it from
pharmacies in Malaysia, though YMMV.
Personally, I get mine by a combination of the two – the Guardian
pharmacy here is staffed by a skeleton crew at night and I go in first,
without any attempt to pretend to look as if I have any valid reason to
be buying syringes. Upon reaching the prescription counter, I will ask
nicely for the items I’m purchasing in English, using the appropriate
terminology where it applies. This is probably when the pharmacist will
give you the Guarded Guardian (TM) look.
It will seem like a cross between a dubious look (so that’s why my
mom always tells me I look like a junkie) and a half surprised look
(which is where the local pharmacist is trying to comprehend the
paradox of a junkie type who speaks English AND apparently knows what
he’s talking about). This is where your (loud) friends come barging in
and generally creates a disturbing atmosphere that would make normal
shop proprietors speed up the transaction to avoid undue discomfort for
the other customers. It helps if your friends don’t look like choir
boys.
This is probably superfluous, but it does wonders in eliminating the
annoying Guarded Guardian, Protector of the Universe (TM) look. Please
remember not to let things get out of hand, you want to establish a
relationship with the pharmacy so that future purchases will be
unquestioned. You’re not here to ju tio (wreck havoc), you’re
here to engage in commerce. I can get injecting equipment alone just
fine, but the trademark expression Guardian Pharmacy teaches new
trainees irks me something awful, so I particularly like to go to
Guardian Pharmacy in a sadistic desire to witness the various possible
permutations (it seems to be indefinite, by my latest count) of the
Guarded Guardian (TM) look.
2. Cigarette lighter
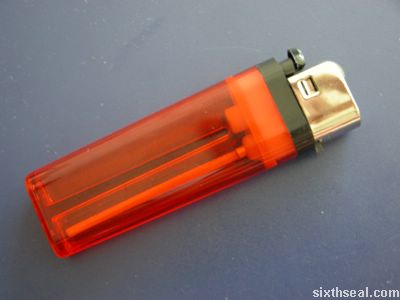
Like in the previous guide, please get the transparent ones where
you can see a single white tube running down one of the two columns.
How to make the EZ-needle lighter:
1. Detach the cover of the lighter to expose the inner workings.
This can be achieved by leverage applied to the gap opposite the gas
release button. Your fingernail will serve this purpose just fine.
2. Remove the needle from the syringe lock (the part that connects
to a syringe body) by pulling away that bit. It should look like the
photo below after you’re done with it.
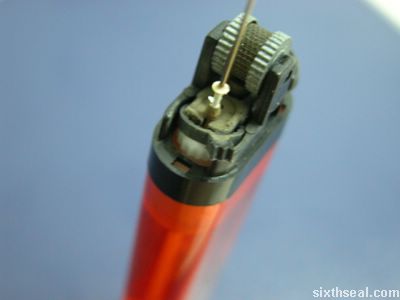
3. Push the base of the syringe needle into the valve that looks
like a mini volcano. Depending on the lighter manufacturer, it will
either miraculously fit like a glove or require some manual pressure
(controlled insertion, don’t jam it down) to get the bottom of the
syringe into the lighter valve. It has been tested on various models
and the common ones have standard valves so those would work fine with
the syringes. Please note that it needs to go into the valve, not over it.
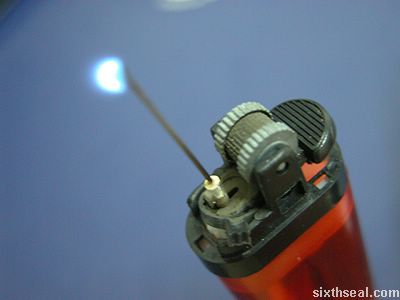
4. Since this is supposed to be a minimal hassle way of producing a
needle lighter, it should be noted that it’s possible to manually
maneuver the flame intensity control bit so that it’s lodged against
one side of the lighter, as shown above. The purpose of this is to make
the gas release button obsolete, since the proper use of this will lift
the gas release lever on the other side to be always on. Please take
note of the way the intensity control piece is manipulated to be lodged
under the gas release lever, making it release combustible gas
automatically. It needs to be stuck in the lever for the continuous gas
release. Test the needle lighter by lighting the tip (be careful not to
touch the syringe tip, this goes for everyone). The needle lighter will
automatically produce a flame if you did the jamming trick correctly.
If the lighter does not ignite, depress the gas button and then light
the tip with another lighter. If this results in a flame, it means your
jamming trick did not produce the desired results. It’s important to
note that you need to really jam the flame intensity rubber bit so that
both “flaps” of the lever is lifted. It may require some dexterity to
get it right…it’s easier to do one side of the flap first by lifting
the level and stuffing (hard, if needs be) the rubber bit in and repeat
with the other flap. The nub will optimally be twisted up to rest on
the side of the lighter as this bit holds the whole contraption
together. You should be able to directly light the needle lighter now.
It’s good practise to make sure that the syringe base is securely
inside the valve – when in doubt, push deeper.
There you have it – a real needle lighter which can be readily
assembled with ease. The needle lighter is not recommended for ages 3
and below due to small detachable parts (and sharp bits). Management is
not responsible for off label use. These contraptions are meant to be
used as a device for instigating the conversion of solid matter into
liquids and then gas. It has come to the attention of the company that
our fine scientific product is being used to smoke methamphetamine
crystals!

It should be noted that this is a perfectly acceptable use of this
instrument as it falls into the intended operation purposes.
Methamphetamine crystals can demonstrate this state change wonderfully.
However, extreme care should be taken so that the vapors are not
accidentally inhaled. These vapors can result in unwanted side effects
which includes, but is not limited to, extreme euphoria, “body rushes”,
and general CNS stimulation. Should accidental inhalation occur while
working with this sample, the subject should be allowed to enjoy the
experience. Effects will subside within a few hours.
Tip: You may have several lighters (either modified or
unmodified) lying around which has been depleted of the liquid gas. It
can still be used to light the needle/syringe lighter – the spark
produced by the flint would get the job done, you don’t really need a
functional lighter with a flame. This is good to keep in mind as you
would not want to be driving out to buy a lighter while you’re tweaking
hard.