Guide to cooking an artichoke

preparing artichoke

I had a lot of fun doing this step-by-step guide to cooking and eating an artichoke. It’s an unusual vegetable which a lot of people avoid due to the difficulty in preparing it. It’s actually not that hard, you just need a sharp pair of kitchen scissors and *a lot of lemons*!

removing artichoke spines

The first one is to snip off the spines of the globe artichoke and the latter is to prevent the rapid oxidization (artichokes almost turn immediately brown when you cut into it).

You will need:

  • 2-3 lemons
  • Sharp kitchen scissors
  • Slicing knife
  • A sturdy metal spoon

eating artichokes

The artichoke we got cost RM 24.69. It’s RM 45.90 per kg and I calculate that each petal costs over RM 1! That’s coz the grocery sells the artichoke with a huge stem (which you can’t really eat).

cutting artichoke thorns

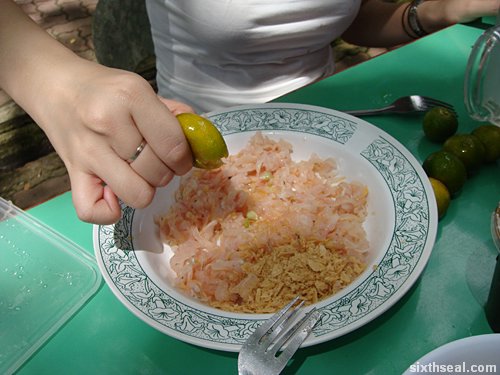
The first thing you do is to snip off the sharp spines in the individual petals on the artichoke. Just use your kitchen scissors to cut it off so a flat edge is formed.

artichoke lemons

You will need to squeeze lemon juice (or rather dip the lemon half into the cut petal) as soon as you snip the thorns off. This is to prevent it from turning brown. Get those lemons ready!!! smirk

artichoke stem

Once you have worked over the entire green artichoke and removed all the thorns, it’s time to cut off the stem. You need to get the stem level to the artichoke or about 1 inch from the end, depending on the recipe.

cutting artichoke

I think the stalk on my artichoke was a good 3-4 inches. It makes it look pretty, like a flower, but most people don’t eat the stem.

opening artichoke

Now that everything is done, you need to remove the choke in the artichoke – use a sharp knife to slice 3/4 of an inch off the top of the artichoke. Remember to squeeze lemon juice all over the artichoke when you do this to prevent oxidization.

removing artichoke

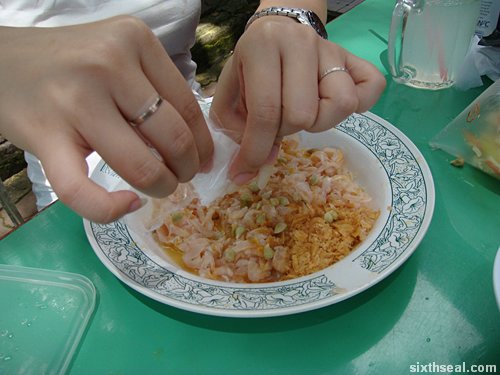
The next part is where your study metal spoon comes in…you need to use it to dig into the artichoke so you remove the choke. Think of it as using the spoon to eat a particularly hard frozen iced confectionery. That’s the same motion you should be using. Dig down and remove!

removing choke

Some people can remove it with one dig but I never could. That’s not important, the important thing is to get the entire choke out since that’s totally inedible. It’s the pink/purple interior of the artichoke that comes with fibres that looks like asbestos.

artichoke choke fibers

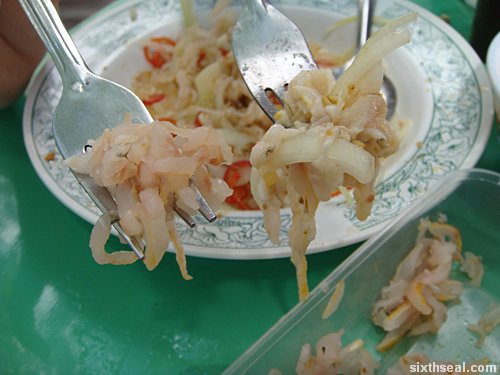
I’m kidding, I don’t know what asbestos fibers look like but I imagine it’s similar to these! It’s almost feather like to the touch and you have to remove every single bit of the choke.

cleaning artichoke

Make sure your artichoke is clean and free of the choke by a simple visual inspection (you can leave the heart in – that’s edible) and it’s ready to cook! You now have a clean artichoke!

dressed artichoke

I did a stuffed artichoke from this with breadcrumbs and garlic – I’ll put that up soon! πŸ™‚

How to French Cut a whole chicken into a crown of breast (step-by-step with photos)

whole chicken

This is the first time I’ve ever cut up a whole chicken. I usually just specify the part(s) that I want from the butcher and he does the rest of the work. However, this time I needed a very specific cut – a beautiful French Cut crown of breast with the skin intact.

free range chicken

I actually saw this in a MasterClass episode and wanted to replicate the dish. It’s not a live chicken of course but it has everything still intact – head, innards etc – it hasn’t even been disemboweled. I bought this for RM 24.60 – it’s a free range chicken that goes for RM 18 / kg.

removing organs

The first step is to cut off the head, ass (Bishop’s nose) and feet so you have more room to work with.

giblets

Then, you’ll have to take the organs out of the body cavity of the chicken – just put your hand down the cloaca (chicken don’t have an anal cavity) and pull out everything you can feel. It’s connected so it’s not that hard – everything from the heart to the liver can be just extracted by just pushing your entire fist in and pulling hard to get the giblets.

pulling giblets

Think of it as the opposite of stuffing a turkey. smirk

cutting whole chicken

I put everything I’ve cut up or removed on a dinner plate for future use.

removing wishbone

The next thing is to remove the wishbone from the chicken. It’s located somewhere in the neck – there’s a small bone that can be cut out and discarded so the crown of breast will be perfect.

cutting legs

I wanted that particular cut to be heavy on the skin so that it’ll be moist so I made the incisions on the skin very close to where the drumstick ends.

crown breast skin

The next step is to twist the entire chicken leg to the opposite direction (to where the chicken would naturally stand if it’s alive) and cut out the leg at the thigh from the oyster that surround the bone.

removing legs

This will allow the skin from the thigh part to cover the entire breast.

french cut chicken

Next, I sliced off the wings and did a French style cut that exposes the bone of the mini drumstick on the wing. You don’t have to do this but it looks pretty. I didn’t do a very good job at it though since it was my first time – I cut it too high up on the joint.

removing carcass

The last bit that needs to be done is to chop off the rest of the carcass. Save this for stock!

breast crown

You’ll have a nice crown of breast with quite a lot of skin on – just the cut I wanted to have for an awesome dish I made over the weekend!

cut hand

I learned a lot about dressing chickens while doing this (and cut my hands several times too) and I’ll just buy whole undressed chickens from now on…

french cut

…so I can get the exact cut that I want! πŸ™‚

Ghetto microwave a.k.a. Cooking with an electric kettle

ghetto microwave

Yup, it functions almost exactly like one. Heh. Okay, let’s say your microwave suddenly stopped working and you need to heat up something in a jiffy.

Ideally, you don’t have to clean up anything too, which you’ll need to if you use the traditional method of a wok and boiling water with the food suspended above.

This is based on the same principle – the steam from an electric kettle (hereby dubbed a β€œghetto microwave”) will do the same thing.

electric kettle

I did it with an awkward sized food item (in this case a sandwich/burger) that’s been in the fridge for a day. I just put some water in the ghetto microwave and turned it on. You don’t even need to hold the food there, just let the lid clamp over it.

There are only two downsides to this:

  • You need to rotate the food item to ensure thorough heating
  • You have to pop in and check on it once in a while coz the auto-shutoff mechanism won’t kick in when the lid is propped open like that

smirk

Guide to marrying the right person

You’ll all heard of my disastrous relationships. This makes me somewhat of an expert in these things if you follow the logic of what doesn’t kill you makes you stronger. smirk

guide pea

I have devised a rather ingenious method based on countless personal encounters to qualitatively research and determine if the girl you’re with is:

  • Just a tiny annotation in the tome called Your Great Journey Through Life

or

  • The princess you’ve been looking for all your life. You want to marry her and live happily ever after till-death-do-you-part-amen.

It involves a pea.

baby peas

Step 1

Buy some frozen peas from your local supermarket

Step 2

Insert pea under the bed

Step 3

Wait and see if the girl comments on it

Specifically, the fairy tale calls for your princess to be able to feel the pea under a mound of mattresses but since that would be logistically difficult to pull off (who sleeps on a stack of mattresses anyway?) – just chuck the pea under your bed.

princess and pea

The height required would be well fulfilled by the empty space below your bed.

Trust me. I have tried this numerous times before. The conversation in bed the first time usually goes like this:

Her: Hmm…that’s a very small pe…
Me: OMG! YOU FELT IT?
Her: Baby, I don’t want to offend you but I can barely feel it.
Me: IT DOESN’T MATTER! DON’T YOU SEE WHAT THIS MEANS? WE’RE MEANT TO BE TOGETHER! πŸ˜€
Her: Is it in yet?
Me: My princess! <3 Works like a charm. Of course, I'm still single but... Oh, wait. Damn.

The “OMG there’s a police car tailing me” FAQ

dangerous police

Q: OMG! There’s a fucking police patrol car tailing me! What should I do?
A: Calm down. Are you really sure it’s following you or is it just on a routine patrol?

Q: I’m fucking sure man, it’s on my ass and following my every turn! How ah how ah?
A: Turn down your stereo, wind up your windows and act like you’re just on your way back home.

Q: I can’t close the windows I’m smoking a cigarette!
A: Okay, hold on to it, you don’t want to fog your car up.

Q: It’s burning my fingers!!!!
A: You’re gonna have a lot of other burning sensations if you chuck it out now so just take it like a man.

Q: Okay, I’m holding on to it. The patrol car is shadowing my every move. Fuck la!
A: Resistance is not futile. Chill. Just go with the flow and don’t draw attention to yourself.

Q: How do I sit ya? Can they see me inside my car ah?
A: Can you see the car in front of you when you have your headlights on? Ya, don’t ask stupid questions. Just be nonchalant.

Q: Shit la, I turned into an alley and this asshole Nissan is like driving 20 km/h and the police is still on my tail and they’re pointing at me. Fuck la, I seriously freaking out dy.
A: WHY ARE YOU LOOKING AT YOUR REAR VIEW MIRROR FOOL? That’s like a sure fire sign you have something to hide. Act like you don’t know it’s a police car behind you can or not?

Q: What if I get stopped ah? Die la!
A: Check your wallet. Got cash or not? Check your car. Got contraband or not? Check your system. Can pass test or not? Actually this all just crap, the first question is the only important one.

Q: Should I take a photo of the police patrol car for my blog?
A: Eh, your mom dropped you on the head as a baby izzit? Idiot! Use stock photos la.

The OMG! I stepped on an electrical socket adapter! FAQ

Fret not, comrades! I’ve come up with an FAQ for this extremely common accident!

faq hole

Q: OMG! I just stepped on a stray electrical socket adapter while going to the loo in the middle of the night! Help! What should I do?
A: Don’t panic. Turn on the light and inspect the damage. Did you step on the white part (good) or the yellow part (bad)?

faq good

Good

faq bad

Bad

Q: How do I know if I’ve stepped on it on the face side up or prong side up?
A: It’s easy. If you stepped on the electrical socket adapter on the face side up, it would most likely twist or warp the contraption with no ill effects to you.

faq shatter

However, if you stepped on it prong side up, you will most likely feel a sharp pain followed by a string of profanity consistent with Tourette Syndrome. You will also notice some bleeding on the soles of your feet.

Q: Phew! I’ve stepped on the white part. What do I need to do?
A: Nothing. Just get another electrical socket adapter if you need it.

Q: How can I prevent occurrences of stepping-on-electrical-socket-adapters in the future?
A: This is a no brainer. Most people won’t them lying around in likely paths of foot traffic in your house…so don’t!

faq hide

Q: What if I’m not most people?
A: You’ll need to consult this guide frequently and often. It might also help to keep some disinfectant in your house e.g. Dettol.

Q: What if I don’t believe in disinfectant?
A: Sure, I understand you just want to go back to sleep after taking a pee. It’s all good. However, be prepared to walk gingerly for the next 2-3 weeks, depending on how hard you stepped on it, which is in turn dependant on your body weight.

Q: 2-3 weeks? Are you kidding me? Does it take that long to heal?
A: As a rule of thumb, yes. Wounds in movable parts of your body (palms, wrist, soles) takes longer to deal due to the constant friction and contact you make with various external objects during the course of the day.

Q: Do I have to see a doctor?
A: Most people won’t have to. However, if you’re a pussy or suffering from haemophilia (which causes your blood to not coagulate properly), it might be a good idea to consider heading over to your GP. At least for the latter.

Q: What’s going to happen to the poor sole of my feet after 2-3 weeks?
A: Well, you’ll form a hard callus where the point of injury occurred. You’ll notice that the skin is significantly thicker and rougher. It’s no big deal.

Q: Okay, what if I still want to leave random items lying around the house and walk around in the middle of the night with no lights on?
A: I strongly suggest snapping off the Earth prong. It’s the one that sticks up the most (the longest one) and from previous experience, it’s the one that causes the most damage. You can also opt to snap off all three for good measure.

faq dismantle

Q: Okay, I’ve done just that. Will I still get injured when I step on it in the middle of the night?
A: Nope, it has now transformed into a nice, benign surface with no pointy bits. It’s perfectly safe to step on, kick around, hide under dirty articles of clothing or anything else you leave around without causing any more harm to unsuspecting nocturnal creatures.

Q: Will I still be able to use the electrical socket after that?
A: Hmm…you can try. But how are you going to plug it in without the prongs?

faq plug

?

The sixthseal.com Guide to Human Advertising

cutting intro

The words “self harm” and “self injury” has been bandied about a lot by psychologists and teenage cutters obsessed with their own angst. It has also been mistakenly labeled as “suicidal behavior” which is grossly inappropriate since most cases are not intended to hasten the kicking of the bucket.

I propose that this behavior be exploited, I mean, explored as a new avenue for advertising instead. We’ve all heard of tattoos as a form of advertising with human advertising billboards but there are problems associated with that (mainly the permanent nature of the process).

Cutting may be a more appropriate “human advertising” medium for events. This is the sixthseal.com Guide to Human Advertising.

razor blades

Step 1: Obtain a box of old skool razor blades. It doesn’t really matter what brand you use as long as it’s properly wrapped, clean and sharp.

steady hands

Step 2: You will require a pair of steady hands. This is necessary to avoid transcription errors due to shaky hands. πŸ˜‰

cutting fresh

Step 3: Use the razor blade to carve the name of the event you want to be promoting. It should optimally be short – use initials when possible e.g. “RWMF” instead of “Rainforest World Music Festival” since skin real estate is at a premium.

cutting healing

Step 4: Please allow sufficient time for the blood to coagulate – it is the body’s natural healing system at work here and it prevents bacteria and other Nasty Stuff (TM) from entering an open wound.

Example:

I have included a video tutorial on skin advertising – this is for the “Sarawak Cultural Festival”, abbreviated to SCF due to skin real estate issues.

Caution:

The right amount of pressure should be applied consistently. It is obviously unwise to apply too much pressure (razor blades are sharper than you think) but enough downwards pressure should be present to achieve the desired results. Please direct your attention to Exhibit A (Cleaned and Healing Scar) below.

cutting guide

The S character has too much pressure applied – this would result in a raised scar. The C character would probably result in a scar that is not visible unless at certain angles, while the F carving would be the optimal result for a scar that is not visible at all, unless under direct sunlight in certain angles.

cutting healed

What do you think? The advertising industry is constantly on the lookout for new opportunities and mediums. Could this be the next new wave of advertising? Or will it be relegated to the fringes of society?

sixthseal.com Guide to Eating Umai

umai stall

Umai is a raw fish dish prepared by the Melanau tribe in Mukah. It’s a must try dish if you ever go to Mukah. It’s the Malaysian version of the sashimi and is traditionally the working lunch for Melanau fishermen.

Umai is made of thinly sliced slivers of raw fish and served with toasted sago pearls. The popularity of the dish for the fishermen is pragmatic – it doesn’t need to be cooked while deep sea fishing and the sago pearls provides the carbohydrates for a filling lunch.

me slicing fish

The fish has to be really fresh for umai to be prepared since it’s eaten raw. I tried my hand at slicing the raw fish and gave myself a nasty cut to the index finger.

umai segar

Umai is readily available in the markets of Mukah and it’s one of the flagship dishes that Mukah is known for (besides sago grubs). There are two different versions of umai – the traditional umai sambal campur and umai cecah jeb.

The sixthseal.com Guide to Eating Umai

umai step 1

Step 1: Ensure that a reputable umai stall is patronized. The fish needs to be really fresh for raw consumption to avoid uncomfortable conditions like E.Coli and explosive diarrhea.

umai step 2

Step 2: Find a comfortable place to mix your own umai. The ingredients for making umai can all be purchased at the stall and most of the stuff is prepackaged and premixed to the right amounts.

umai step 3

Step 3: Receptacles for the mixing of umai is essential. You would require a plate and a bowl in addition to forks. Sago pearls are eaten using your hand. Empty the raw slivers of fish into the plate. You can opt to retain a small portion of the raw fish for the the other version of umai.

umai step 4

Step 4: Inspect the contents of your umai sambal campur package. It should contain a bag of premixed ingredients essential to the umai experience containing raw onions and chillies. Calamansi limes should also be in the package for the original umai as well as a small packet of salt and the crunchy peanut cookies.

umai step 5

Step 5: Open the packet of crumbly peanut cookies and put it on top of the raw fish slivers. This is the secret ingredient in all good umai dishes that provides the sweet and crunchy texture to the dish.

umai step 6

Step 6: Crush the peanut cookie into a finely grounded powder using the fork. You need the peanut cake to be evenly distributed throughout the dish.

umai step 7

Step 7: Pierce the calamansi limes using a fork to enable a reasonable flow of the juice into the umai. Do not attempt to squeeze the lime without penetrating it with a fork (or another sharp utensil) first. Splash damage is likely to occur.

umai step 8

Step 8: Squeeze the calamansi lime over the raw fish.

umai step 9

Step 9: You need all the calamansi lime juice provided since the acidic nature of the fruit “cooks” the raw fish. I’ll explain the scientific principles at the bottom of the guide.

umai step 10

Step 10: Open the small packet of salt and empty the contents into the umai. The salt offsets the sourness of the calamansi lime and makes it sweet.

umai step 11

Step 11: Open the plastic bag containing the thinly sliced onions and chillies and empty it into the plate of umai.

umai step 12

Step 12: Toss the umai with a fork as you would toss a salad. The motions are similar and so are the aims – to mix everything as evenly as possible. The traditional umai is now ready for consumption!

umai step 13

Step 13: The final step is to empty the sago pearls into a bowl for easier consumption. The sago pearls are eaten using your bare hands to go with the umai.

umai step 14

Step 14: Consume the umai with a handful of sago pearls. The umai should be eaten first and chased with the sago pearls for the authentic Melanau umai experience.

Guide to eating umai video

Optional:

umai jeb

There is a new variant of umai called the umai cecah jeb which is dipped into a sambal (spicy paste) concoction.

umai jeb eat

You’re supposed to take a forkful of umai (raw fish) and then dip it into the special sambal sauce and eat it. It’s delicious! The sambal really got oomph! Very spicy. I like!

Guide to eating umai cecah jeb video

Caution:

splash damage 2

Splash damage is likely to occur even with the proper piercing technique as can be seen on Clare’s top. Respect the calamansi lime and it shall respect you. πŸ˜‰

Explanation:

difference is clear

The calamansi lime has acidic properties that “cooks” (cures would be a better word) the raw fish in the umai due to reasons beyond my understanding. It just works.
The left fork contains the raw fish before the calamansi lime treatment and the right fork contains the slightly “cooked” fish after being marinated in calamansi lime. You can see the difference in the coloration and texture of the fish.
The difference is clear (TM). πŸ˜‰

sixthseal.com Guide to Eating Live Sago Worms

sago worm guide

Sago worms are eaten raw in Mukah, where it is considered a delicacy of sorts. Sago worms looks a lot like huge, fat maggots with spiny fangs.

sago worms header

The worms will actually bite you if you touch it’s head, which is why it’s advisable to tear the head off before consuming it raw.

sago worms packet

Sago worms are sold live, in packets of RM 5 and you can still see the worms wriggling around in the packet.

sago worms

The native habitat of sago worms is inside the trunk of a sago palm tree. The worms are kept in the sago flour and picked out and packaged into manageable sizes.

The sixthseal.com Guide to Eating Live Sago Worms

step 1

Step 1: Pick a big, fat and juicy worm. Care should be taken to not touch the sago worm’s head since it has pincers that will bite you. The pincers are used to burrow into the sago palm trunk so it’s quite sharp.

step 2

Step 2: Look the sago worm in it’s eyes. You’re about to pull it’s head off and eat it so it’s only polite to smile at it before doing so. Worms have feelings too.

step 3

Step 3: After the niceties has been done away with, it is time for heads to roll. Grip the squirming worm firmly with one hand and use the forefinger and thumb of your other hand to grasp the sago worm’s head and rip it off.

step 4

Step 4: Insert the still wriggling worm into your mouth.

step 5

Step 5: Chew. Take the time to savor the taste of live sago worms. There is a burst of flavor when you first bite into the wriggling worm from the innards spilling out onto your palate. Delicious!

Caution:

splash damage

Care should be taken when plucking the head off the sago worm. The innards can cause a bit of Splash Damage (TM) as can be seen with Clare’s spaghetti strap top.

sago worm stall

Thanks to the friendly people at the sago worm stall in Mukah for showing us the proper way to consume a live sago worm.

Sago worms are delicious! It’s a little bit like Pringles, once you start, you can’t stop. I ate a lot of the worms with Clare. She overcame the Fear Factor bit and ate a couple of the worms too.

Here’s another video guide to eating live sago worms. I took three videos of the process just to get it right. Heh!

Sago worms. Mmm…tastes like chicken! πŸ™‚

Guide to making rojak

rojak

Rojak is a local variant of the fruit salad that is usually served with thick, dark sauce and topped with coarsely ground peanuts. It’s a very popular dish for snacking on and Bintangor rojak is one of the most famous rojak concoctions out there, much like Klang bak kut teh. Keing managed to get hold of the rojak sauce from her trip to Bintangor and we decided to make some rojak at Joyce’s house.

The sixthseal.com Guide to Making Rojak:

You will need:
Cucumbers
Pineapples
Potato cakes
Tofu
Rojak sauce

slice cucumber

Slice some cucumbers into coarse chunks. You can peel the cucumbers beforehand if you don’t like the skin. It is important to slice both ends of a cucumber first and use the ends to rub the cucumber – this somehow attenuates the bitterness of the cucumber through reasons unknown to modern science.

diced cucumbers

The cucumber should be processed to be roughly angular chunks instead of pure circular slices for authenticity. No one slices cucumbers into rojak – slicing cucumbers is better suited to sandwiches and eye masks.

heat oil

The next thing to do is to heat up some oil in a frying pan. This is for the tofu and sweet potato fried in batter (optional).

sweet potato

The sweet potato slices in batter can be bought from your friendly neighborhood kueh vendor for RM 0.30 per piece. This can be fried (basically reheated) later for the rojak.

tofu

The tofu should be fried whole instead of being sliced. This is so the frying process only imparts a certain crunchiness to the tofu while maintaining a soft and sauce absorbing interior when sliced.

cut tofu

Joyce tells me that fried tofu should never be sliced – it flattens the entire thing. The proper method is to cut it using sharp kitchen scissors.

build up

The build up of ingredients should be contained in a large base serving dish for easy tossing and mixing.

pineapple

Next, the pineapples. Now, dealing with pineapples can be a bit of a prickly problem. This is due to the circumference of  “thorns” on a pineapple (which is one of the naturally occurring Fibonacci sequences in the world). The trick is to slice in an oblique direction down the entire length of the pineapple to cut out the “eyes”. The de-thorned pineapple can then be further sliced into appropriate lengths…
(Or you could just do it like us normal folks and get the pre-sliced pineapples)

pineapple chunks

…and then chunks. Pineapple must be present in rojak despite the hassle involved. It’s not rojak if there’s no pineapple in it.

rojak sauce

The essential ingredient in rojak is undoubtedly the rojak sauce. This is acquired from the famous stall in Bintangor and has a thick, gooey consistency. It’s RM 7 for a bottle of the sauce.

ground peanuts

Ground peanuts is an optional but highly recommended ingredient. You can get it pre-ground in hypermarkets and other supermarkets or just do it yourself in a food processor/mill.

add sauce

Heap all the ingredients into the bowl and then add in the rojak sauce to taste. The rojak sauce should completely cover and saturate all the ingredients until it puddles down at the bottom of the bowl.

add peanuts

Sprinkle ground peanuts over it…

mix

…and mix it well. Don’t toss it like a regular fruit salad, the pineapples are fragile and would likely bruise. Just mix it carefully, blending in all the sauce into the ingredients.

meal

We also had Coke chicken, prepared by Joyce earlier in the day. It’s awesomely tender, the meat practically falls off the bone! It tastes great too. Katherine’s mom also cooked some curry chicken, and she brought a pot of it over and made it into a meal.

rojak done

Here’s a closer look at the finished rojak.

Related Posts Plugin for WordPress, Blogger...